height3d
During one of my research projects in Petnica Science Center, I have developed small open source framework which adds C++ features to OpenGL and lays around it. I will give short introduction in this article how to use Height3D framework to make your job of creating small 3D apps easier.
Installation
Height3D can be downloaded on GitHub
To install it, just run:
cmake .
make
make install
Basic handling of buffers and shaders
First of all, it functions just like OpenGL, you have to write shaders and link and compile them. Then you send data to shaders and these data get rendered on the screen. Currently Height3S has support for SDL to render graphics on your window.
Basic vertex shader is shown below:
#version 120
attribute vec4 vPosition;

void main()
{
  gl_Position = vPosition;
}
Here we just set our vertex coordinates. Fragment shader is shown below:
#version 120
attribute vec4 vPosition;

void main()
{
  gl_Position = vPosition;
}
As you can see, you write shaders just you would write them in your standard OpenGL application, these are basic shaders suitable for drawing 2D objects.
Now let’s see our code implementation for this particular example:
#include <iostream>

#define GL3_PROTOTYPES 1
#include <GL/glew.h>

#include <core/Vector.hpp>

#include <SDL2/SDL.h>

#include "debug.hpp"
#include "shaders.hpp"
#include "sdl_init.hpp"

#include "core/Buffer.hpp"
#include "core/Vector.hpp"

#include "gui/Window.hpp"

using namespace std;

int main()
{

	Window win(512, 512, "tutorial");

	glClearColor ( 1.0, 0.0, 0.0, 1.0 );
	glClear ( GL_COLOR_BUFFER_BIT );
	win.redraw();
	win.delay(2000);

	glClearColor ( 0.0, 1.0, 0.0, 1.0 );
	glClear ( GL_COLOR_BUFFER_BIT );
	win.redraw();
	win.delay(2000);

	glClearColor ( 0.0, 0.0, 1.0, 1.0 );
	glClear ( GL_COLOR_BUFFER_BIT );
	win.redraw();
	win.delay(2000);

	glewInit();
	Program program;
	program.addShader(Shader(GL_VERTEX_SHADER, "functional/basic//shader.vp"));
	program.addShader(Shader(GL_FRAGMENT_SHADER, "functional/basic/shader.fp"));
	program.link();
	program.bind();

	int loc = program.getAttributeLocation("vPosition");
	program.enableAttributeArray(loc);
	Vector vertices[3] = {
		Vector(-1.0, -1.0, 0.0, 0.0),
		Vector(1.0, -1.0, 0.0, 0.0),
		Vector(0.0, 1.0, 0.0, 0.0)
	};
	GLfloat g_vertex_buffer_data[] = {

		-1.0f, -1.0f, 0.0f,

		1.0f, -1.0f, 0.0f,

		0.0f,  1.0f, 0.0f,

	};

	Buffer buf(GL_ARRAY_BUFFER);
	buf.sendData(vertices, 3, false);
	buf.bind();

	program.setAttributeArray(loc, 3);

	glDrawArrays(GL_TRIANGLES, 0, 3); // Starting from vertex 0; 3 vertices total -> 1 triangle

	win.redraw();
	win.delay(2000);

	SDL_Quit();
	return 0;
}
As you can see, here we can recognize basic opengl element with GLEW. The catch point here is that we have Objects Program which
is responsible for compiling and linking our shaders and Buffer which is OOP implementation of buffer communication to GPU.
In this example, we draw our window with three colors and then draw red triangle on it.
Textures
We can also use textures to color our objects, for example the following code will draw triangle with nice gradient on it:
#include <iostream>

#define GL3_PROTOTYPES 1
#include <GL/glew.h>

#include <core/Vector.hpp>

#include <SDL2/SDL.h>

#include "core/Program.hpp"
#include "core/Buffer.hpp"
#include "core/Vector.hpp"
#include "core/Texture.hpp"

#include "gui/Window.hpp"

#include <textures/GradientTextureFactory.hpp>

using namespace std;

int main()
{

	Window win(512, 512, "tutorial");

	glClearColor ( 0.0, 0.0, 0.0, 1.0 );
	glClear ( GL_COLOR_BUFFER_BIT );
	win.redraw();
	win.delay(2000);

	glewInit();
	Program program;
	program.addShader(Shader(GL_VERTEX_SHADER, "functional/textures/shader.vp"));
	program.addShader(Shader(GL_FRAGMENT_SHADER, "functional/textures/shader.fp"));
	program.link();
	program.bind();

	int loc = program.getAttributeLocation("vPosition");
	int coords_loc = program.getAttributeLocation("uv");
	int sampler_loc = program.getUniformLocation("image");
	program.enableAttributeArray(loc);
	program.enableAttributeArray(coords_loc);
	Vector vertices[3] = {
		Vector(-1.0, -1.0, 0.0, 0.0),
		Vector(1.0, -1.0, 0.0, 0.0),
		Vector(0.0, 1.0, 0.0, 0.0)
	};

	float coordinates[] = {
		0.0, 1.0,
		1.0, 1.0,
		0.5, 0.0
	};

	Buffer buf(GL_ARRAY_BUFFER);
	buf.sendData(vertices, 3, false);
	buf.bind();

	program.setAttributeArray(loc, 3);

	Buffer coords_buffer(GL_ARRAY_BUFFER);
	coords_buffer.sendData(coordinates, 6);
	coords_buffer.bind();
	program.setAttributeArray(coords_loc, 2);

	/*float image[512][512][3];
	for (int i = 0; i<512; i++)
	{
		for (int j = 0; j<512; j++)
		{
			image[i][j][2] = 1.0;
			image[i][j][1] = 0;
			image[i][j][0] = j / 512.0;
		}
	}
	Texture t(GL_TEXTURE_2D, 512, 512);
	t.sendData(image);*/
	Texture t = GradientTextureFactory(Color(0, 0, 1.0), Color(1.0, 0, 0), 512, 512).getTexture();
	t.bind();

	program.setUniformValue(sampler_loc);

	glDrawArrays(GL_TRIANGLES, 0, 3); // Starting from vertex 0; 3 vertices total -> 1 triangle

	win.redraw();
	win.delay(2000);

	SDL_Quit();
	return 0;
}
But now we will also have to modify our shader:
#version 120

attribute vec4 vPosition;
attribute vec2 uv;
varying vec2 st;

void main()
{
  gl_Position = vPosition;
  st = uv;
}
and fragment shader:
#version 120

varying vec2 st;
uniform sampler2D image;

void main()
{
  gl_FragColor = texture2D(image, st);
}
When we compile and test this, we will get something like below:

Here we are using gradient texture factory class to construct texture for us.
Phong shading and Scene class
This before was just introduction of what Height3D can do but it is not all!
To fully use benefits of OOP, there’s class SDLLoop which can be subclassed and you can implement event handling, initialization and similar things there. Also, this class exposes onFrame() method which can be implemented to do drawing of objects for us.
Also, there’s Scene class which can draw all objects for you, using that class you can set camera position, perspective parameters
as well as to add objects. Here important thing is to distinguish between object and model. Model is description of how something is drawn on unit cube, it specifies vertex coordinates, texture coordinates, vertex normals etc. You can implement your own model
by subclassing AbstractModel class and then implementing needed methods. In these methods, you have to return needed coordinates, colors and normals.
Object is made of model, its size, position, assigned texture etc…
For all our examples we will use the following code skeleton:
vertex shader:
#version 120

attribute vec4 vPosition;
attribute vec4 vColor;
attribute vec2 uv;
attribute vec4 Normal;


varying vec3 N;
varying vec3 L;
varying vec3 E;

uniform mat4 model;
uniform mat4 perspective;
uniform vec4 LightPosition;

void main()
{
  gl_Position = perspective * model * vPosition;

  N = Normal.xyz;
  L = LightPosition.xyz - vPosition.xyz;
  if (LightPosition.w == 0) L = LightPosition.xyz;
  E = vPosition.xyz;

}
fragment shader:
#version 120


uniform sampler2D image;

uniform vec4 ambientProduct, diffuseProduct, specularProduct;
uniform vec4 LightPosition;
uniform float shininess;

varying vec3 N;
varying vec3 L;
varying vec3 E;


void main()
{
  vec3 NN = normalize(N);
  vec3 EE = normalize(E);
  vec3 LL = normalize(L);
  vec4 ambient, diffuse, specular;

  vec3 H = normalize(LL+EE);
  float kd = max(dot(LL,NN), 0.0);
  float ks = pow(max(dot(NN, H), 0.0), shininess);

  ambient = ambientProduct;
  diffuse = kd*diffuseProduct;
  specular = ks*specularProduct;
  gl_FragColor = vec4((ambient + diffuse + specular).xyz, 1.0);
}
and our code will look like this:
#include <iostream>

#define GL3_PROTOTYPES 1
#include <GL/glew.h>

#include <core/Vector.hpp>

#include <SDL2/SDL.h>

#include <core/Program.hpp>
#include <core/Buffer.hpp>
#include <core/Vector.hpp>
#include <core/Texture.hpp>
#include <core/Scene.hpp>
#include <core/SceneObject.hpp>
#include <core/AbstractModel.hpp>

#include <gui/Window.hpp>

#include <cmath>

#include <loops/SDLLoop.hpp>
#include <loops/SDLEvent.hpp>

using namespace std;

class PhongCubeModel : public AbstractModel
{
protected:
	std::vector<float> genVertices()
	{
		// we have to return vector<float> instance which represents vertex coordinates of our model
	}
	vector<int> genIndices() {
		// here we have to return vertex indices, i.e. order of which vertices are drawn
	}

	vector<float> genTextureCoordinates() {
		// here we return texture coordinates
	}

	vector<float> genVertexColors() {
		// here we return vertex colours in case textures are not used in shader
		// we will use textures in shaders so you only have to pay attention the size of this vector is appropirate
	}

	vector<float> genNormals()
	{
		// here we have to return normals for each vertex
	}
};

class MyPhongLoop : public SDLLoop
{

	Program program;
	int vertexLocation, texCoordLocation, vertexColorLocation, samplerLocation, modelLocation, perspectiveLocation;
	int normalLocation, ambientProductLocation, diffuseProductLocation, specularProductLocation, lightPositionLocation, shininessLocation;
	Scene scene;

	SceneObject* cube;

	// angle of rotation
	float alpha;

public:
	MyPhongLoop(Window *w) : SDLLoop(w)
	{
		cout << "Initializing glew\n";
		glewInit();

		cout << "Binding program\n";
		program.addShader(Shader(GL_VERTEX_SHADER, "functional/phong/shader.vp"));
		program.addShader(Shader(GL_FRAGMENT_SHADER, "functional/phong/shader.fp"));
		program.link();
		program.bind();

		cout << "Getting locations of shader parameters\n";
		vertexLocation = program.getAttributeLocation("vPosition");
		texCoordLocation = program.getAttributeLocation("uv");
		vertexColorLocation = program.getAttributeLocation("vColor");
		samplerLocation = program.getUniformLocation("image");
		modelLocation = program.getUniformLocation("model");
		perspectiveLocation= program.getUniformLocation("perspective");
		normalLocation = program.getAttributeLocation("Normal");
		ambientProductLocation = program.getUniformLocation("ambientProduct");
		diffuseProductLocation = program.getUniformLocation("diffuseProduct");
		specularProductLocation = program.getUniformLocation("specularProduct");
		lightPositionLocation = program.getUniformLocation("LightPosition");
		shininessLocation = program.getUniformLocation("shininess");

		cout <<  program.getAttributeLocation("vPosition")<< endl;
		cout <<  program.getAttributeLocation("uv")<< endl;
		cout <<  program.getAttributeLocation("vColor")<< endl;
		cout <<  program.getUniformLocation("image")<< endl;
		cout <<  program.getUniformLocation("model")<< endl;
		cout <<  program.getUniformLocation("perspective")<< endl;
		cout <<  program.getAttributeLocation("Normal")<< endl;
		cout <<  program.getUniformLocation("ambientProduct")<< endl;
		cout <<  program.getUniformLocation("diffuseProduct")<< endl;
		cout <<  program.getUniformLocation("specularProduct")<< endl;
		cout <<  program.getUniformLocation("LightPosition")<< endl;
		cout <<  program.getUniformLocation("shininess")<< endl;

		cout << "Normal location: " << normalLocation << endl;

		program.enableAttributeArray(vertexLocation);
		program.enableAttributeArray(texCoordLocation);
		program.enableAttributeArray(vertexColorLocation);
		program.enableAttributeArray(normalLocation);
	}


protected:
	void onInit()
	{
		cout << "Setting scene\n";
		scene.setCamera(0, 0, 0, Vector(0, 0.0, 1.00), Vector(0, 1, 0));
		scene.setPerspective(3.1415 / 2, 1.0, 0.1, 10);
		cube = scene.addObject(new SceneObject(
			new  PhongCubeModel(), // use cube model to draw this object
			new Texture(GL_TEXTURE_2D, 1, 1, GL_RGB), // use dummy texture
			0.0, 0.0, 0.0, // location
			0.0, 0.0, // angles of rotation
			0.5, 0.5, 0.5,  // size
			Material(
				Color(1.0,0,0), // ambiental conductivity
				Color(1.0, 0, 0), // diffusional conductivity
				Color(1.0, 0, 0), // specular conductivity
				2, 1, 0.2, // diffusion params
				1 // shininess
			)
		));
		SceneObject *cube2 = scene.addObject(
			new SceneObject(
				new PhongCubeModel(),
				new Texture(GL_TEXTURE_2D, 1, 1, GL_RGB),
				5.0, 0.0, 0.0,
				0.0, 0.0,
				0.5, 0.5, 0.5,
				Material(
					Color(1, 0, 0),
					Color(1, 0, 0),
					Color(1,0,0),
					1, 0, 1,
					1
				)
			)
		);
		alpha = 0.0;
		cout << "Adding light\n";
		scene.addLight(new Light(0, 2, 0, // position
				Color(0.2, 0.0, 0.0), // ambient component
				Color(0.4, 0.0, 0.0), // diffuse component
				Color(0.4, 0.8, 0.9) // specular component
			),
			lightPositionLocation, ambientProductLocation, diffuseProductLocation, specularProductLocation
		);
	}

	void onKeyPress(Event e)
	{
		if (e == SDLEvent::asEvent(SDLK_LEFT)) alpha -= 3.14 / 20;
		if (e == SDLEvent::asEvent(SDLK_RIGHT)) alpha += 3.14 / 20;
		scene.setCamera(0,1,0, Vector(5*cos(alpha), -1, 5*sin(alpha)), Vector(0,1,0));
	}

	void onKeyRelease(Event e)
	{

	}

	void onQuit()
	{
		SDL_Quit();
	}

	void onFrame()
	{
		cout << "Drawing\n";
		scene.drawObjects(
			&program,
			modelLocation,
			perspectiveLocation,
			vertexLocation,
			texCoordLocation,
			vertexColorLocation,
			samplerLocation,
			true, // use phong lighting model
			shininessLocation,
			normalLocation
		);
	}
};

int main()
{

	cout << "Running phong";
	Window win(512, 512, "tutorial");
	MyPhongLoop loop(&win);
	loop.run();
	return 0;
}
Now we can implement our mode, for example, to be cube:
class PhongCubeModel : public AbstractModel
{
protected:
        std::vector<float> genVertices()
        {
                float vertices[24] =
                {
                        // bottom face
                        -1.0, -1.0, -1.0,
                        1.0, -1.0, -1.0,
                        -1.0, -1.0, 1.0,
                        1.0, -1.0, 1.0,

                        // top face
                        -1.0, 1.0, -1.0,
                        1.0, 1.0, -1.0,
                        -1.0, 1.0, 1.0,
                        1.0, 1.0, 1.0,
                };
                return vector<float>(vertices, vertices+24);
        }
        vector<int> genIndices() {

                int indices[36] =
                {
                        // bottom face
                        0, 1, 2,
                        1, 2, 3,

                        // left face
                        0, 2, 4,
                        4, 6, 2,

                        // right face
                        1, 3, 5,
                        5, 3, 7,

                        // front face
                        0, 1, 4,
                        4, 1, 5,

                        // back face
                        2, 3, 7,
                        7, 6, 2,

                        // top face
                        4, 5, 6,
                        5, 6, 7
                };
                return vector<int>(indices, indices+36);
        }

        vector<float> genTextureCoordinates() {

                float textures[16] = {
                        0.0, 0.0,
                        0.0, 0.0,
                        0.0, 0.0,
                        0.0, 0.0,
                        0.0, 0.0,
                        0.0, 0.0,
                        0.0, 0.0,
                        0.0, 0.0,
                };
                return vector<float>(textures, textures+16);
        }

        vector<float> genVertexColors() {

                float colors[32] =
                {
                        1.0, 0.0, 0.0, 1.0,
                        0.0, 1.0, 0.0, 1.0,
                        0.0, 0.0, 1.0, 1.0,
                        1.0, 1.0, 0.0, 1.0,

                        1.0, 0.0, 0.0, 1.0,
                        0.0, 1.0, 0.0, 1.0,
                        0.0, 0.0, 1.0, 1.0,
                        1.0, 1.0, 0.0, 1.0
                };
                return vector<float>(colors, colors+32);
        }

        vector<float> genNormals()
        {
                cout << "Generating normals\n";
                float a[24] = {
                -1.0, -1.0, -1.0,
                1.0, -1.0, -1.0,
                -1.0, -1.0, 1.0,
                1.0, -1.0, 1.0,
                -1.0, 1.0, -1.0,
                1.0, 1.0, -1.0,
                -1.0, 1.0, 1.0,
                1.0, 1.0, 1.0
                };
                return vector<float>(a, a+24);
        }
};
so when you compile your program, you’ll get something like this:
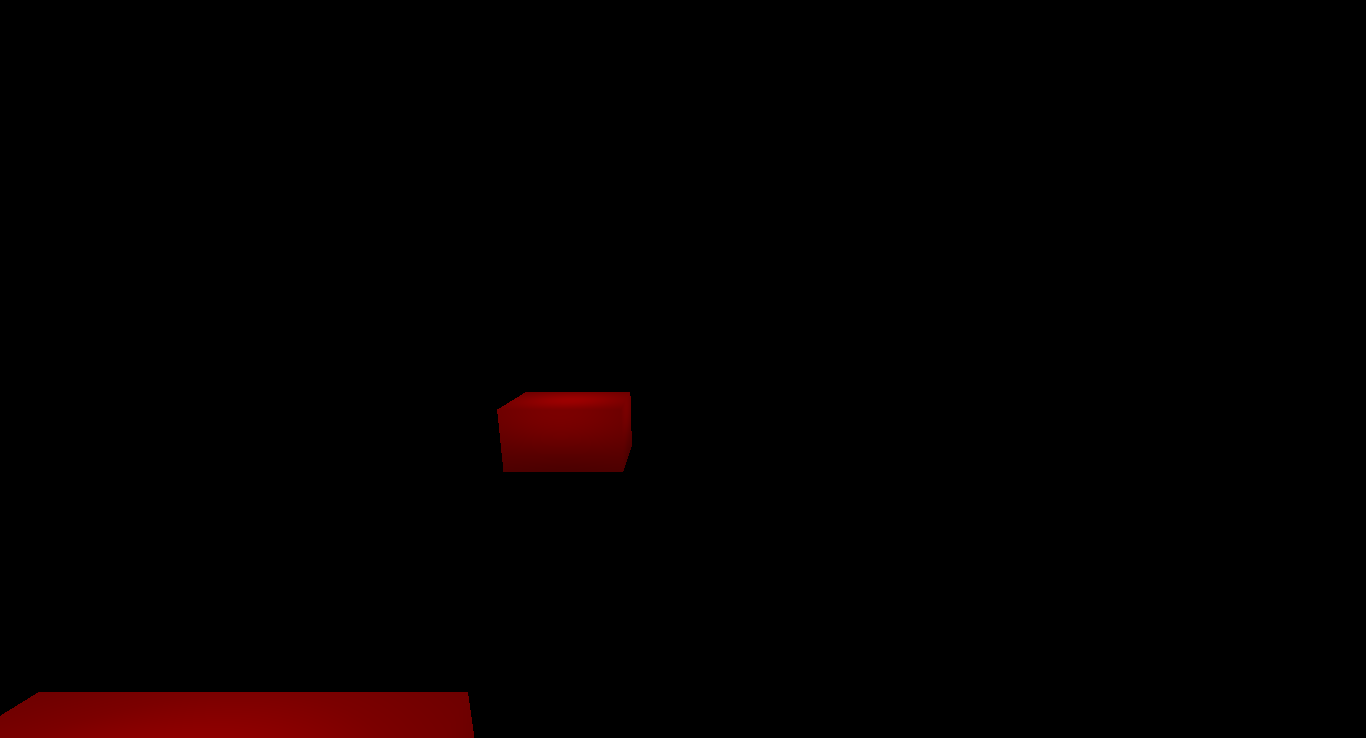
You can now use your arrows to navigate through the scene.
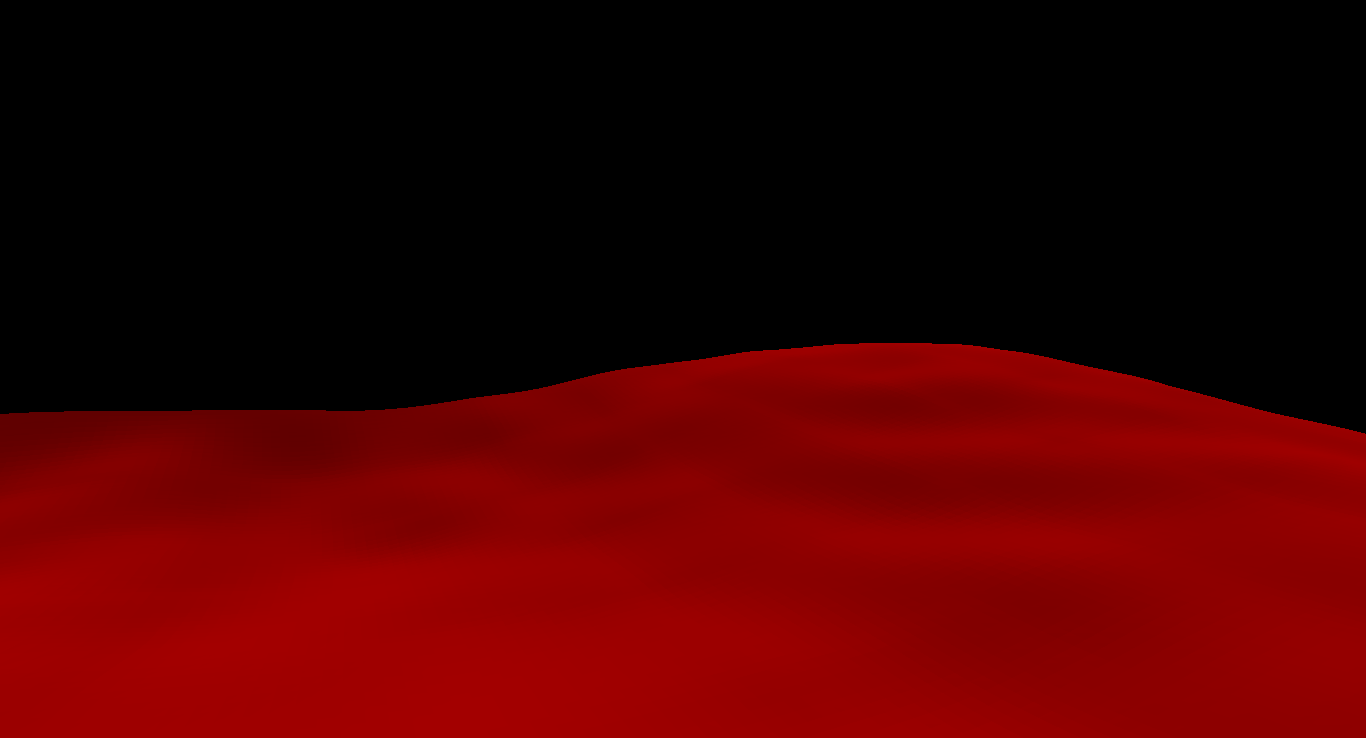
Height fields
You can make models easily by making height fields. A height field is model which has two levels: bottom and top one. For every coordinate on unit cube, it draws surface starting from bottom level and ending on top level. You can specify height by giving function
which returns pair<float, float> where first number is starting height and second number is ending height. To use this, you have to include HeightfieldModel class:
#include <structures/heightfield/LayeredHeightfield.hpp>
#include <structures/heightfield/LayeredHeightfieldModel.hpp>
For example, to make a cube, you will use something like this:
LayeredHeightfield h = new LayeredHeightfield(128); // as its constructor, we pass precision, how many samples we want in unit cube, too high precision means better look but consumes more memory

h->addLevel(); // we have to add level to it, every level is one heightfield. For example if we want two cubes separated by space and one is on top of another, we will have to levels!

h->assign([=] (int level, float x, float z) -> pair<float, float> {return make_pair(0, 1);}); // we use lambda functions here
And now we can use our heightfield to construct model and object with it:
cube = scene.addObject(new SceneObject(
	new  LayeredHeightfieldModel(h), // use cube model to draw this object
	new Texture(GL_TEXTURE_2D, 1, 1, GL_RGB), // use dummy texture
	0.0, 0.0, 0.0, // location
	0.0, 0.0, // angles of rotation
	0.5, 0.5, 0.5,  // size
	Material(
		Color(1.0,0,0), // ambiental conductivity
		Color(1.0, 0, 0), // diffusional conductivity
		Color(1.0, 0, 0), // specular conductivity
		2, 1, 0.2, // diffusion params
		1 // shininess
	)
));
More
This project is still in development and I know that there’s still much of boilerplate code and I will work to decrease amount of
code needed to implement some stuff. I will post about that when I make changes. You can see more examples on repository under
functional directory, here are some photos what can be done (from examples in repository):